TOAST stands for The Oversized-Attribute Storage Technique. PostgreSQL uses a fixed page size (commonly 8 kB), and does not allow tuples to span multiple pages. Therefore, it is not possible to store very large field values directly. To overcome this limitation, large field values are compressed and/or broken up into multiple physical rows. Read More
Toast is an operation in PostgreSQL to handle large chunks of data to fit in page buffer. When the data surpass TOAST_TUPLE_THRESHOLD (2KB default), Postgres will squeeze the data, trying to fit in 2KB buffer size. If the compressing of the large column data does not lead to smaller block (<2KB), it will be split into smaller chunks.
Because of how the pointer system is implemented, most TOAST table column types limited to a max size of 1GB.
Almost every table you create has its own related (unique) TOAST table, which may or may not ever end up being utilized, depending on the size of rows you insert. A table with only fixed-width columns like integers may not have an associated toast table.
All of this is transparent to the user and enabled by default.
The benefit of TOAST table is that whenever data requires retrieving from TOAST table, it only needs to refer to TOAST table; otherwise, it does not refer to it unnecessarily.
How to find whether a TOAST table is correlated with your main tables?
You can easily select reltoastrelid from pg_class. Like any other table ObjectID is also assigned to TOAST Table.
SELECT relname,reltoastrelid
FROM pg_class
WHERE relname='Table_Name';
This blog post describes how to deploy a TiDB cluster on GCP Google Kubernetes Engine (GKE). TiDB on Kubernetes is the standard way to deploy TiDB on public clouds.
TiDB Architecture
TiDB is designed to consist of multiple components. These components communicate with each other and form a complete TiDB system. The architecture is as follows:
TiDB server
The TiDB server is a stateless SQL layer that exposes the connection endpoint of the MySQL protocol to the outside. The TiDB server receives SQL requests, performs SQL parsing and optimization, and ultimately generates a distributed execution plan. It is horizontally scalable and provides the unified interface to the outside through the load balancing components such as Linux Virtual Server (LVS), HAProxy, or F5. It does not store data and is only for computing and SQL analyzing, transmitting actual data read request to TiKV nodes (or TiFlash nodes).
Placement Driver (PD) server
The PD server is the metadata managing component of the entire cluster. It stores metadata of real-time data distribution of every single TiKV node and the topology structure of the entire TiDB cluster, provides the TiDB Dashboard management UI, and allocates transaction IDs to distributed transactions. The PD server is “the brain” of the entire TiDB cluster because it not only stores metadata of the cluster, but also sends data scheduling command to specific TiKV nodes according to the data distribution state reported by TiKV nodes in real time. In addition, the PD server consists of three nodes at least and has high availability. It is recommended to deploy an odd number of PD nodes.
Storage servers
Storage servers
TiKV server
The TiKV server is responsible for storing data. TiKV is a distributed transactional key-value storage engine. Region is the basic unit to store data. Each Region stores the data for a particular Key Range which is a left-closed and right-open interval from StartKey to EndKey. Multiple Regions exist in each TiKV node. TiKV APIs provide native support to distributed transactions at the key-value pair level and supports the Snapshot Isolation level isolation by default. This is the core of how TiDB supports distributed transactions at the SQL level. After processing SQL statements, the TiDB server converts the SQL execution plan to an actual call to the TiKV API. Therefore, data is stored in TiKV. All the data in TiKV is automatically maintained in multiple replicas (three replicas by default), so TiKV has native high availability and supports automatic failover.
TiFlash server
The TiFlash Server is a special type of storage server. Unlike ordinary TiKV nodes, TiFlash stores data by column, mainly designed to accelerate analytical processing.
Prerequisites
Before deploying a TiDB cluster on GCP GKE, make sure the following requirements are satisfied
1) Create a project
2) Enable Kubernetes Engine API
3) Activate Cloud Shell
Ensure that you have the available quote for Compute Engine CPU in your cluster’s region.
4) Configure the GCP service
Configure your GCP project and default region.
gcloud config set core/project
gcloud config set compute/region

Example:
gcloud config set core/project erudite-spot-326413
gcloud config set compute/zone us-west1-a
TiDB Operator uses Custom Resource Definition (CRD) to extend Kubernetes. Therefore, to use TiDB Operator, you must first create the TidbCluster CRD, which is a one-time job in your Kubernetes cluster.
kubectl get pods --namespace tidb-admin -l app.kubernetes.io/instance=tidb-admin
kubectl get pods --namespace tidb-admin -o wide
Deploy a TiDB Cluster and the Monitoring Component
This section describes how to deploy a TiDB cluster and its monitoring services.
Create namespace
kubectl create namespace tidb-cluster
Note: A namespace is a virtual cluster backed by the same physical cluster. This document takes tidb-cluster as an example. If you want to use other namespace, modify the corresponding arguments of -n or –namespace.
Download the sample TidbCluster and TidbMonitor configuration files
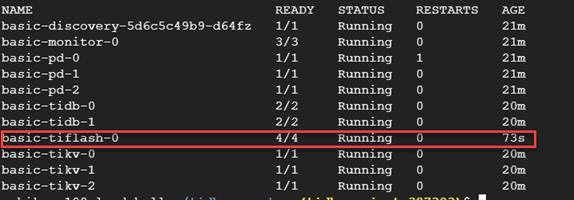
Wait until all Pods for all services are started. As soon as you see Pods of each type (-pd, -tikv, and -tidb) are in the “Running” state, you can press Ctrl+C to get back to the command line and go on to connect to your TiDB cluster.
View the cluster status
kubectl get pods -n tidb-cluster
Get list of services in the tidb-cluster
kubectl get svc -n tidb-cluster
Access the TiDB database
After you deploy a TiDB cluster, you can access the TiDB database via MySQL client.
Prepare a bastion host
The LoadBalancer created for your TiDB cluster is an intranet LoadBalancer. You can create a bastion host in the cluster VPC to access the database.
Note: You can also create the bastion host in other zones in the same region.
Note: In the regional cluster, the nodes are created in 3 zones. Therefore, after scaling out, the number of nodes is 2 * 3 = 6.
After that, execute kubectl edit tc basic -n tidb-cluster and modify each component’s replicas to the desired number of replicas. The scaling-out process is then completed.
kubectl edit tc basic -n tidb-cluster
Deploy TiFlash and TiCDC
TiFlash is the columnar storage extension of TiKV.
TiCDC is a tool for replicating the incremental data of TiDB by pulling TiKV change logs.
In this blog post, I’m going to show you how to setup GTID replication using Mariabackup.
There are 2 main benefits of using global transaction:
Failover is easier than with file-based replication.
the state of the slave is recorded in a crash-safe way.
Here are the general steps:
Enable binary logging on the master
Enable GTID
Create a replication user on the master
Set a unique server_id on the slave
Take backup from the master
Restore on the slave
Execute the CHANGE MASTER TO command
Start the replication
1. Ensure that the server_id value and bind_address are configured differently in my.cnf in each of the server
that will be part of the replication.
In this example, we will configure a 2 node master-slave setup. The bind-address is the hostname IP.
vi my.cnf
In Master:
server_id=1
bind-address=192.168.1.115
In Replica:
server_id=2
bind-address=192.168.1.131
2. Enable binary logging and GTID strict mode in both servers
show global variables like 'log_bin';

+---------------+-------+
| Variable_name | Value |
+---------------+-------+
| log_bin       | ON    |
+---------------+-------+
show global variables like '%gtid_strict_mode%';

+------------------+-------+
| Variable_name    | Value |
+------------------+-------+
| gtid_strict_mode | ON    |
+------------------+-------+
If bin logging is not enabled, you may do so by adding the line below in my.cnf
log-bin = db1-bin

# Or specify an different path

log-bin = /mariadb/bin/logs/bin_logs/bin_log
Restart DB service for the change to take effect.
sudo service mysql stop

sudo serivice mysql start
If gtid is not enabled, add the line below in my.cnf, then enable it globally.
Add this line in cnf
gtid_strict_mode=1
Login to MariaDB, then set global_script_mode=1.
set global gtid_strict_mode=1;
3. Create a user in Master.
The replica is going to use this user connection to read the binary logs on the master and then put those into the relay logs on the replica.
CREATE USER 'repl'@'%' IDENTIFIED BY 'P@$$w0rd';
GRANT RELOAD, SUPER, REPLICATION SLAVE, REPLICATION CLIENT ON *.* TO 'repl'@'%';
4. Install qpress (As root) in both Master and Slave for compression/decompression.
6. In Replica, create a directory where we will place the backup from Master
mkdir -p /mariadb/backup/rep
7. In Master, use scp to transfer the entire backup image to the replica.
# Go to the directory where you placed the backup
cd /mariadb/backup

scp -rp full_backup mysql@192.168.1.131:/mariadb/backup/rep
8. In Replica, Stop DB Service
sudo service mysql stop

# Verify that DB service has been stopped
ps -ef| grep mysqld
9. In Replica, Remove all contents in Data Directory.
mkdir -p /mariadb/data/old_data
mv /mariadb/data/* /mariadb/data/old_data/
rm -rf /mariadb/data/old_data/

# Ensure that the data directory is empty
cd /mariadb/data
ls -la
10. In Replica, copy the backup image to data directory.
In this blog post, I’m gonna highlight the differences in GTID replication between MySQL and MariaDB
I will not go thru step-by-step setup, because they are many resources out there that do.
The main reason to use GTID is that it makes it easier to track and compare replicated transaction between master and replica; hence, allowing simpler failover and recovery.
Here are the differences between MySQL and MariaDB
1. Composition of GTID
In MariaDB, it is composed of three separated dashed numbers like x-y-z
x: first number – domain ID
y: second number – server ID
z: third number – sequence number
In MySQL, there are 2 parts:
source_id
transaction_id
2. Enabling GTIDs
To enable GTID, we have to set the following parameters in my.cnf
In MySQL:
gtid_mode
enforce_gtid_consistency
gtid-mode=ON
enforce-gtid-consistency
In MariaDB:
gtid_strict_mode
gtid_strict_mode=1
enforce_gtid_consistency does not exist in MariaDB
3. CHANGE MASTER TO statement
In order for the Replica to identify its Master (data source), and to use GTID-based auto-positioning, we need execute the CHANGE MASTER TO statement. In MySQL, we use the MASTER_AUTO_POSITION option to tell the replica that transactions will be identified by GTIDs.
In MariaDB, A slave is configured to use GTID by CHANGE MASTER TO master_use_gtid=slave_pos. The replication will start at the position of the last GTID replicated to slave when the slave connects to the master. Refer to the official documentation for more info https://mariadb.com/kb/en/gtid/
Example In MariaDB:
change master to
master_host='192.168.1.120',
master_port=3306,
master_user='repl',
master_password='password',
master_use_gtid=slave_pos;