MariaDB – Enabling Semisynchronous Replication

In this blog post, we are going to learn how to enable Semisynchronous Replication in MariaDB.

MariaDB provides semisynchronous replication option besides the standard MariaDB asynchronous replication.

In Asynchronous replication, the Master does not wait for a slave to confirm that an event has been received whenever the slave request events from the Master’s binary log.

Semisynchronous Replication

The procedure to enable Semisynchronous Replication below applies only to MariaDB 10.3.3 and later since it is already built into MariaDB server and is no long provided by a plugin.

It can be set dynamically with SET GLOBAL.

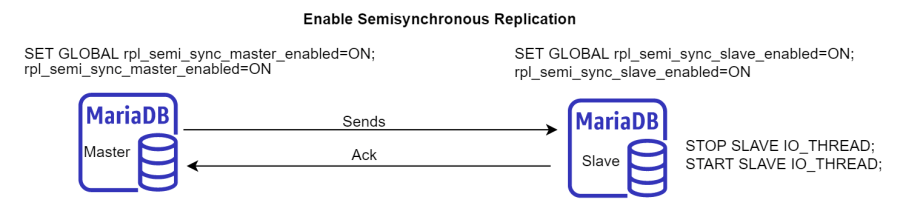
SET GLOBAL rpl_semi_sync_master_enabled=ON;

It can also be set in my.cnf

[mariadb]
...
rpl_semi_sync_master_enabled=ON

To enable Semisynchronous Replication on the Slave dynamically with SET GLOBAL.

SET GLOBAL rpl_semi_sync_slave_enabled=ON;

It can also be set in my.cnf

[mariadb]
...
rpl_semi_sync_slave_enabled=ON

If slave threads are already running when you enable Semisynchronous Replication, you need to restart slave I/O thread. Otherwise, it will continue to use asynchronous replication.

STOP SLAVE IO_THREAD;
START SLAVE IO_THREAD;

Configuring the Master Timeout

In semisynchronous replication, the slave acknowledges the receipt of the transaction’s events only after the events have been written to the relay log and flushed.

A timeout will occur if the slave does not acknowledge the transaction before a certain amount time, and the Master will be switching to Asynchronous replication.

Rpl_semi_sync_master_status status variable will be switched to OFF when this happens.

Semisynchronous replication will be resumed when at least one semisynchronous slave catches up, and at the same time Rpl_semi_sync_master_status status variable will be switched to ON.

The timeout period is configurable. It can be changed by setting the rpl_semi_sync_master_timeout system variable.

It can be set dynamically with SET GLOBAL.

SET GLOBAL rpl_semi_sync_master_timeout=20000;

It can also be set in my.cnf

[mariadb]
...
rpl_semi_sync_master_timeout=20000

Cheers!

Knowledge worth sharing...Share on linkedin
Linkedin
Share on facebook
Facebook
Share on google
Google
Share on twitter
Twitter

MariaDB/MySQL – InnoDB_flush_log_at_trx_commit

In this blog post, we are going to talk about the variable InnoDB_flush_log_at_trx_commit. We are going to discuss what each value that we can assign to this variable means, and how it can affect performance and durability.

Innodb_flush_log_at_trx_commit controls the durability in ACID compliance

A – atomicity

C – consistency

I – isolation

D – durability

The possible values for this variable is 0, 1, and 2.

The specific path of the query goes to the innodb buffer pool, then log buffer (redo logs), then OS buffer, then finally to log file.

When innodb flush log at transaction commit is set to 0, your write goes thru memory, thru the buffer pool into the log buffer. That write then flushes from the log buffer to the log file on disk for every 1 second or when the OS flushes.

If this variable is set to 1, which is maximum durability. Your write goes to the log buffer, but the commit of the file ensures that it is written all the way on disk. This value will have a bit of performance hit compared to value 0.

If the value is set to 2, the write goes to the log buffer, but the file will be committed all the way to the OS buffer. And then the OS will flush to disk roughly every 1 second.

Advantages and Disadvantages

0 – when the database crashes, the log buffer within memory will get loss, and there is a possibility of losing those transaction. This setting is for performance, but not for durability.

1 – every write will surely be written to the redo log on disk. You will not lose that write regardless of the crash.

2 – You will lose only about 25% performance as compared to 1. If the DB crashes, the file is still written to disk cache, and then written to disk later. But if the DB server itself crashes, that DB server’s disk buffer may lose its data. This can be prevented though if we have battery backup or SAN.

Knowledge worth sharing...Share on linkedin
Linkedin
Share on facebook
Facebook
Share on google
Google
Share on twitter
Twitter

MariaDB/MySQL – Difference Between Undo and Redo

Undo log is used to keep track of changes performed by active transactions and roll them backup if necessary. It is physically stored in the system table spce and, optionally, in other tablespaces.

Redo log tracks data of the requested data changes and is used to recover tables after a crash. It is physically stored in dedicated files.

Redo and Undo logs are both used during crash recovery.

Knowledge worth sharing...Share on linkedin
Linkedin
Share on facebook
Facebook
Share on google
Google
Share on twitter
Twitter

MariaDB – How to Resolve Slow/Lagging Replication

In our environment where we have thousands of MariaDB servers, 95% of the reason why replication is slow or lagging is because there are many tables that do not have primary key.

Below is an example of what we can see in show processlist when the SQL Thread is lagging because many tables do not have primary keys.

Below is a script to check tables that do not have a primary key.

SELECT tables.table_schema, 
       tables.table_name, 
       tables.table_rows 
FROM   information_schema.tables 
       LEFT JOIN (SELECT table_schema, 
                         table_name 
                  FROM   information_schema.statistics 
                  GROUP  BY table_schema, 
                            table_name, 
                            index_name 
                  HAVING Sum(CASE 
                               WHEN non_unique = 0 
                                    AND nullable != 'YES' THEN 1 
                               ELSE 0 
                             end) = Count(*)) puks 
              ON tables.table_schema = puks.table_schema 
                 AND tables.table_name = puks.table_name 
WHERE  puks.table_name IS NULL 
       AND tables.table_schema NOT IN ( 'mysql', 'information_schema', 
                                        'performance_schema' 
                                        , 'sys' ) 
       AND tables.table_type = 'BASE TABLE' 
       AND engine = 'InnoDB'; 

Using the script above, I counted how many tables do not have primary key, and found out that there are 64 tables.

Having a primary key should be the norm/best practice in terms of designing schema anyway.

We have to ensure all our tables have primary key. This will guarantee that all rows are unique, and it will make the SQL thread locate rows to delete (or update) easily.

If there is no way to logically add a natural primary key for the table, a potential solution is to add an auto-increment unsigned integer column as the primary key.

Cheers!

Knowledge worth sharing...Share on linkedin
Linkedin
Share on facebook
Facebook
Share on google
Google
Share on twitter
Twitter

MariaDB / MySQL – Doublewrite Buffer

The Doublewrite Buffer provides a copy of a page needed to recover from a page corruption. This kind of corruption can happen when there is a power failure while InnoDB is writing a page to disk. InnoDB can track down the corruption from the mismatch of the page checksum while reading that page.

InnoDB writes a page to the doublewrite buffer first whenever it flushes page to disk. InnoDB will write the page to the final destination only when the buffer is safely flushed to disk. When recovering, InnoDB scans the double write buffer and for each valid page in the buffer, and checks if the page in the data file is valid too.

Cheers!

Knowledge worth sharing...Share on linkedin
Linkedin
Share on facebook
Facebook
Share on google
Google
Share on twitter
Twitter

MariaDB – Streaming Backup Using mbstream When Provisioning a Slave

In this blog post, I will be showing you the commands that we can use to do streaming backup using mbstream, and how to redirect the stream to a slave , which can be useful especially when you have insufficient disk space in the Master server to hold multiple copies of backup images.

To redirect backup stream to a slave server, we use the socat utility.

Socat stands for Socket Cat. It is a relay for bidirectional data transfer between two independent data channels.

You can install socat using the command below

yum install -y socat

This is the first command that we will execute in Slave.

mkdir -p /mariadb/backup/rep/full_backup_`date +%Y%m%d`
BKPREPDIR=/mariadb/backup/rep/full_backup_`date +%Y%m%d`
socat -d -d TCP4-LISTEN:9999 STDOUT | ssh  mysql@<slave_ip>  \ 
"mbstream --directory=$BKPREPDIR -x"

The following is the breakdown of the command.

After the socat keyword, the next part of the command is the option part. The -d -d option prints fatal, error, warning, and notice messages.

Followed by the standard out stream keyword.

The next part of the command is the address type, option, and port.

Then after a pipe, the next command is the ssh connection to Slave. The port in ssh connection string is optional.

Now, Socat will listen on port 9999, and whatever it gets on port 9999, it will stream it to slave server, and to the directory that we specify.

When we execute this command in the slave server, this is what it should look like.

Below is the same command, but without the ssh connection port.

The following is the next command to be executed in the Master.

DB_ETC=/mariadb/bin/etc
USER=YourUser
PASS=YourPassword
CONNECTION_STRING="--user=$USER --password=$PASS"
DEFAULT_FILES=${DB_ETC}/my.cnf

mariabackup --defaults-file=${DEFAULT_FILES} ${CONNECTION_STRING} \ 
--backup --compress --stream=mbstream  --parallel=4 \
--compress-threads=12 | socat - TCP4:<slave_ip>:9999

The –compress-threads option defines the number of worker threads to use in compression. It can be used together with –parallel option. In the example above, we use –parallel=4, and –compress-threads=12. This means that it will create 4 I/O threads to read the data; then pipe it to 12 threads for compression.

When we execute the mariabackup command in the Master, below is what we will observe in slave. We will see that it is starting to do data transfer.

When the backup finishes, we will see that it exits with status 0.

Cheers!

Knowledge worth sharing...Share on linkedin
Linkedin
Share on facebook
Facebook
Share on google
Google
Share on twitter
Twitter