Below is a simple script to get the database owner names.
SELECT
    name AS [Database Name],
    suser_sname( owner_sid ) AS [Database Owner Name]
FROM
    sys.databases

Cheers!


There are two techniques to achieve this: 1) Using Sys Schema; 2) Using INFORMATION_SCHEMA.COLUMNS
Technique 1: Using Sys Schema
SELECT OBJECT_SCHEMA_NAME (c.object_id) SchemaName,
        o.Name AS Table_Name,
        c.Name AS Field_Name,
        t.Name AS Data_Type,
        t.max_length AS Length_Size,
        t.precision AS Precision
FROM sys.columns c
     INNER JOIN sys.objects o ON o.object_id = c.object_id
     LEFT JOIN  sys.types t on t.user_type_id  = c.user_type_id
WHERE o.type = 'U'
-- and o.Name = N'TableName'
ORDER BY o.Name, c.Name
Technique 2: Using INFORMATION_SCHEMA.COLUMNS
SELECT *
FROM SVS.INFORMATION_SCHEMA.COLUMNS
WHERE TABLE_NAME = N'TableName'
Cheers!
Run the query below to immediately detect if SSL is configured on your SQL Server.
SELECT session_id, encrypt_option
FROM sys.dm_exec_connections

This will show the session_ids currently connected to SQL Server. If the value of encrypt_option is TRUE, then it is using a secured connection.
Cheers!
I just installed an Enterprise Editon of SQL Server 2016 on Windows 2012 R2. I noticed the syspolicy_purge_history is failing.

Below is the error message. I observed the line set-ExecutionPolicy RemoteSigned -Scope process -Force

I tried to set the execution policy to RemoteSigned in Powershell as what was suggested in the error message but was not successful even when I run powershell as Administrator.

What is syspolicy_purge_history?
This job removes policies evaluation history. When a policy runs, it stores the results in MSDB. Over a period of time, this may will cause unnecessary data getting piled up in MSDB. The job syspolicy_purge_history prunes the data older than the the days defined in HistoryRetentionInDays property of Policy Management.
CAUSE:
The ‘Execution Policy’ at the Machine Policy scope is currently set to Unrestricted. This may override the configuration at the ‘Process’ scope.
SOLUTION:
This issue may be resolved by setting the ‘ExecutionPolicy’ to ‘RemoteSigned‘. But I could not change the ‘ExecutionPolicy’ in Powershell. So what I did was to change it directly in the registry.

I verified the change I made in Powershell.

The job syspolicy_purge_history now runs successfully.

VIEW SERVER STATE is a server level permissions that allows a user to view Dynamic Management Objects.
Users will encounter the error below if they don’t have this permission.
Msg 300, Level 14, State 1, Line 1
VIEW SERVER STATE permission was denied on object ‘server’, database ‘master’.
Msg 297, Level 16, State 1, Line 1
The user does not have permission to perform this action.
There are 2 ways to grant this permission to a user: T-SQL and SSMS
From Server properites to to Permissions.

2. T-SQL
GRANT VIEW SERVER STATE TO AppMIS
Cheers!
First, let’s run through the Replication components before we setup Peer-to-Peer replication.
What is Peer-to-Peer Replication?
In Peer-to-Peer, what it does is that it takes the one-way street where everything that happens in the publisher gets pushed off to the subscriber and turns it into a two-way street (bi-directional replication). Everything that happens in the subscriber can also be pushed to the publisher. In Peer-to -Peer, we only have conflict detection not conflict resolution. The key with peer to peer is to avoid conflict entirely.
Steps To Setup Peer-to-Peer Replication:
1. Create distribution on all instances that are participating in Peer-to-Peer.
You must configure a distributor for each node that will be participating in peer-to-peer else you will encounter the error below.

To set up distributor, follow the steps below.
right-click on Replication > Configure Distribution…

Click Next.

Choose the first option. Click Next.

Specify a snapshot folder path. Click Next.

Click Next.

Click Next.

Click Next.

Click Finish.

Click Close.

Note: Do the same for all the instances that will be participating in Peer-to-Peer Replication
2. Backup the databases to replicate then restore it in the subscriber node (data needs to be synchronized first before we configure peer-to-peer)
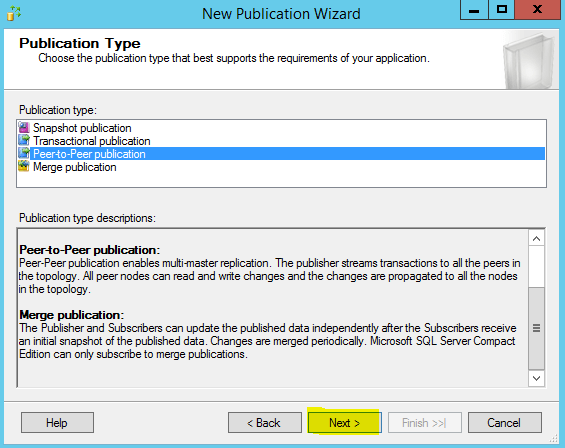
3. Create publication.
Right-click on Local Publication > New Publication…

Click Next.

Choose the database where the articles to be published are located. Click Next.

Choose Peer-to-Peer Publication. Click Next.
Choose the object/s to publish. Click Next.

Click Next.

It is a best practice to specify the account that you will use to run the Log Reader Agent process. However, for the purpose of this Demo, I will just use the SQL Server Agent service account. Click OK.

Click Next.

Optionally, you can generate a script file with steps to create the publication. I will not choose to in this demo.
Click Next.

Give your publication a name then click Finish.

Click Close.

4. Configure Peer-to-Peer topology.
Right-click on your publication > Configure Peer-to-Peer Topology.

Choose the newly created publication. Click Next.

Hover your cursor on the first node. Take note of the Peer originator id. As you can see, it is 100.

Now, on the topology Wizard, right-click on the design surface> Add a New Peer Node.

Connect to subscriber node.

Select the database on your subscriber. This is the database that we restored from your publisher. If you recall, at the beginning of this tutorial, that we backed up the database that we want to replicate and restored it in the subscriber node.

The Peer Originator ID of the first node is 100 remember? This is now the 2nd node and we will set the Peer Originator ID to 101. If we want add more nodes to the topology, then just set the Peer Originator ID of the next node to 102, the next node to 103, etc. You get the idea.
Tick Connect to ALL displayed nodes and choose Use Push subscription (optionally you can choose Pull subscription)
Click OK.

Now we can see the 2nd node that we just added visually on the design surface.
Click Next.

Click the ellipsis…

It is a best practice to specify an account that you will use to run the Log Reader Agent process. However, for the purpose of this Demo, I will just use the SQL Server Agent service account. Click OK.

Click Next.

Click the ellipsis…

It is a best practice to specify an account that you will use to run the Distribution Agent process. However, for the purpose of this Demo, I will just use the SQL Server Agent service account. Click OK.

Tick the “Use the first peer’s security settings for all other peers”. This is useful especially if you have many peers configured.
Click Next.

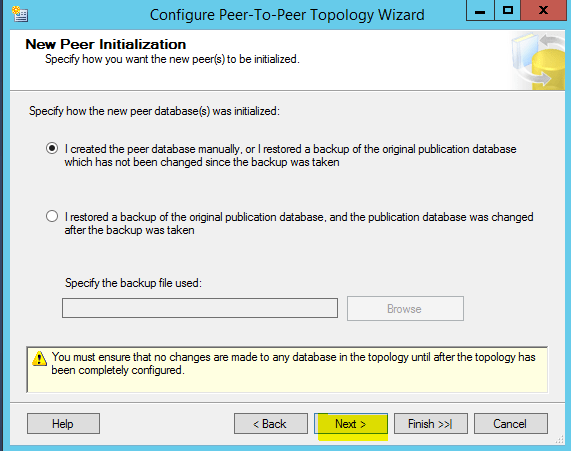
In the next page of the wizard, we have to specify how we want the new peer(s) to be initialized. Choose the first option if you know that there are no changes made since the last the backup was taken. However, if there were data modification after the backup was taken, choose the second option.
Click Next.
Review the choices that you have made, then click Finish.

Click Close.

In this blog post, we have learned how to setup Peer-to-Peer Replication. Everything that happens in the subscriber will also be published to the publisher. Just take note that in Peer-to-Peer, we only have conflict detection not conflict resolution. We have to avoid conflict entirely.
I used to rename a database like this.
ALTER DATABASE ConorDB MODIFY NAME = KhabibDB;
But if you use the above method, the logical name and file name will not change. Let’s verify using the script below.
USE master
GO

SELECT
name AS [Logical Name],
physical_name AS [DB File Path],
type_desc AS [File Type],
state_desc AS [State]
FROM sys.master_files
WHERE database_id = DB_ID(N'KhabibDB')
GO

So you will notice that, even though we renamed the database to KhabibDB, the logical name and file name is still ConorDB. Nevertheless, you have accomplished your objective of renaming your database.
But wait! There is a better way of renaming SQL Server databases that I’m going to show you now!
The procedures below will not only rename your database, but it will also rename the Logical Name and the File Name of the database.
A Better Way To Rename a SQL Server Database
1. Place database in a single user mode.
ALTER DATABASE [ConorDB] SET SINGLE_USER WITH ROLLBACK IMMEDIATE
2. Modify the logical names.
ALTER DATABASE [ConorDB] MODIFY FILE (NAME=N'ConorDB_data', NEWNAME=N'KhabibDB_data')
GO
ALTER DATABASE [ConorDB] MODIFY FILE (NAME=N'ConorDB_log', NEWNAME=N'KhabibDB_log')
GO

3. Detach the database so that we can rename the physical data files.
USE [master]
GO
EXEC master.dbo.sp_detach_db @dbname = N'ConorDB'
GO
4. After we have detach the database successfully, we can now rename the physical data files. We can do this either manually or by using xp_cmdshell system stored procedure. The xp_cmdshell feature can be enabled using the sp_configure system stored procedure.
USE master
GO
sp_configure 'show advanced options'
GO
/* 0 = Disabled , 1 = Enabled */
sp_configure 'xp_cmdshell', 1
GO
RECONFIGURE WITH OVERRIDE
GO
5. Now that xp_cmdshell is enabled, we can proceed to rename the physical files of the database using the script below.
USE [master]
GO
EXEC xp_cmdshell 'RENAME "S:\Demo\ConorDB_data.mdf", "KhabibDB_data.mdf"'
GO
EXEC xp_cmdshell 'RENAME "S:\Demo\ConorDB_log.ldf", "KhabibDB_log.ldf"'
GO
6. After that’s done, let’s attach the database using the script below.
USE [master]
GO
CREATE DATABASE KhabibDB ON
( FILENAME = N'S:\Demo\KhabibDB_data.mdf' ),
( FILENAME = N'S:\Demo\KhabibDB_log.ldf' )
FOR ATTACH
GO
7. You may rename the actual database now if you have not done so.
ALTER DATABASE ConorDB MODIFY NAME = KhabibDB;
8. Lastly, let’s allow multi-user access for the database.
ALTER DATABASE KhabibDB SET MULTI_USER
GO
9. Use the script below the verify the Logical and Physical File Names of the database.
USE master
GO

SELECT
name AS [Logical Name],
physical_name AS [DB File Path],
type_desc AS [File Type],
state_desc AS [State]
FROM sys.master_files
WHERE database_id = DB_ID(N'KhabibDB')
GO

NOTE: SQL Server Management Studio is not part of the SQL Server 2016 media anymore Please download it here
1. Download SQL Server 2016 Developer Edition. I downloaded SQL Server 2016 Developer Edition using my MSDN account.

Alternatively you may go this link to get the SQL Server 2016 Evaluation.
2. Right-click then Run SQL Server 2016 setup as administrator.

3. Choose Installation on the left-pane then click New SQL Server stand-alone installation… (the first choice).

4. I’m installing a Developer edition (free) hence there is no need to enter a product key. Click Next.

5. Accept the license terms then click Next.

6. I opted not to tick User Microsoft Updates. Click Next.

7. Ignore the warning about Windows Firewall. This means that the Windows Firewall for Database Engine Access is not yet configured. We can do that later. Click Next.

8. Select the necessary features that you need. You can read the descrption in the feature description box.


9. Choose Default instance if you are not going to create multiple instances of SQL Server on the same machine. Otherwise go for Named Instance. Click Next.

10. Enter the service accounts that you will use to run SQL Services. I’ve set the Startup Type to Automatic for all components.

11. Go to the Collation tab. I’ve accepted the defaults because this is exactly what our application needs. Some application require you to choose a specific collation. You can click Customize to change it. Click Next.

12. I’ve chosen Mixed Mode. This is highly recommended so that there is an additional built in SA accout with a separate user name and password. To add users such as the one I’m using, click Add Current User. to allow account to log into SQL Server.

13. I left the Data Directories to defaults. Though it can be changed if you have a multiple disk environment. Additionally, for better performance, you may want to separate out where different parts of the DBMS go.

14. Configure multiple tempDB data files. This is to increase the I/O throughput to tempdb. When you create multiple data files, they will all be in the primary filegroup and SQL Server uses a proportional fill algorithm to determine which file to use for each request to create an object. If all the files are exactly the same size, then SQL Server uses the files in a “round robin” fashion, spreading the load equally across the files. As a general guideline, create one data file for each CPU on the server and then adjust the number of files up or down as necessary.

15. I did not enable FILESTREAM but you may want to if you plan to explore large file types such as BLOB. Click Next.

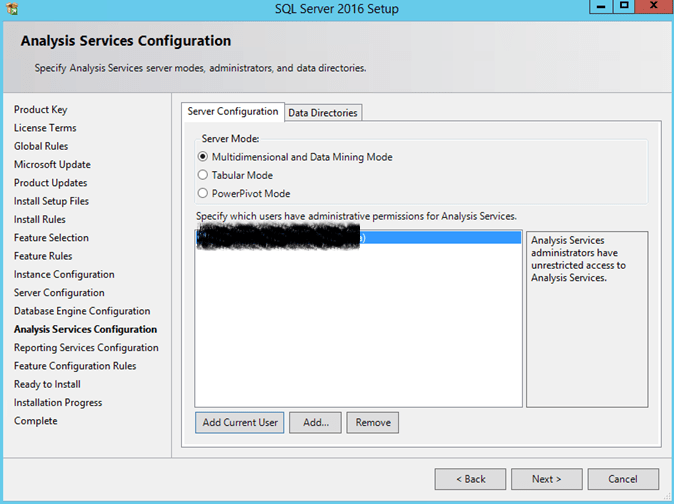
16. If you have selected Analysis Services component, you will be shown with the following screen. Select the Multidimensional and Data Mining Mode. Click Add Current User. Click Next.
17. Leave the Data Directories to default. Click Next.

18. If you have selected Reporting Services component, you will be presented with the following screen. I chose Install only. We will configure it later. Click Next.

19. Review selected features and click Install.

20. Once completed. Click Close.

I encountered the error below.
Msg 9002, Level 17, State 2, Line 1
The transaction log for database ‘DBName’ is full due to ‘LOG_BACKUP’.
The following are the corrective actions that can be done.
Execute the script below to know what is the reason why the log cannot be cleared.
SELECT [log_reuse_wait_desc]
	FROM [master].[sys].[databases]
	WHERE [name] = N'DB_Name';
GO
Some examples of why the log is not clearing are LOG_BACKUP, DATABASE_MIRRORING, NOTHING.
You may check the full list in Books Online at http://bit.ly/PoX2xe
Orphaned users in SQL Server occur when a database user is based on a login in the master database, but the login no longer exists in master. This can occur when the login is deleted, or when the database is moved to another server where the login does not exist. This topic describes how to find orphaned users, and remap them to logins.
Below is a script that I use to view orphaned users.
DECLARE cur CURSOR FAST_FORWARD FOR
SELECT name FROM sys.databases
WHERE database_id > 4

OPEN cur

DECLARE @SQL NVARCHAR(MAX), @DBName SYSNAME
DECLARE @Results TABLE (DBName SYSNAME, UserName SYSNAME, UserSID VARBINARY(MAX))

FETCH NEXT FROM cur into @DBName

WHILE @@FETCH_STATUS = 0
BEGIN
	SET @SQL = 'USE ' + @DBName + ';SELECT ''' + @DBName + ''' AS DBName,
			UserName = name, UserSID = sid from sysusers
			WHERE issqluser = 1 AND
				(sid IS NOT NULL AND sid <> 0x0) AND
				(LEN(sid) <= 16) AND SUSER_SNAME(sid) IS NULL'

	INSERT INTO @Results
	EXEC(@SQL)

	FETCH NEXT FROM cur into @DBName
END

CLOSE cur
DEALLOCATE cur

SELECT * FROM @Results


